Reproducible Environments with Docker
Wesley Banfield
Plan
- The need for reproducible computing
- What is Docker?
- Running your first container
- Building your first container
- Publishing your container
- Using Volumes
- Using Docker Compose
- Best Practices
- Creating a Github Repository
- Alternatives
The need for reproducible computing
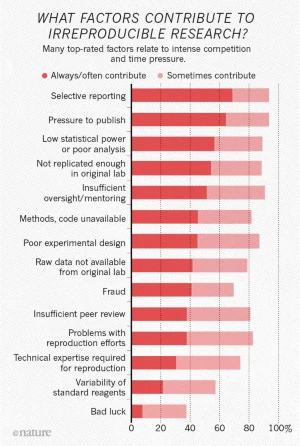
How can we distribute code?
- scripts, notebooks, NbViewer
- Github, Bitbucket, GitLab, etc.
Difficulties
- Read Only / Cached Version / Can't change data
- Variations in code environment → different results or crashes
- Code version in repo different to current version → Not the same as article
What is Docker?
- Docker is a containerization (virtualisation) tool
- Think of it as a virtual machine
-
Docker has :
- images: equivalent to an iso used to create a virtual machine for instance
- containers: and instance of an image, multiple containers can be based/run of from the same image
Running your first container
$
docker run -i -t ubuntu /bin/bash
Building your first container
Create a notebook
In this example we are going to use a dummy notebook to show how to create reprodiucible figures. Please bear in mind that this is only a demo you can do the same steps with other notebooks OR code.Download the following notebook locally: Click to Download and put it into a src folder.
Data
Download the following data locally: Click to Download and put it into a Data Folder
Specifying the environment
Look inside the notebook and find the external libraries. Put these into a requirements.txt file.
hvplot==0.7.0
xarray==0.16.2
In the file above we are only "freezing" the libraries we use and not their dependancies.
Be as specific as possible with the versions
Specifying the environment
This "freezes" everything in the environment even libraries that aren't used, it can cause
problems if certain packages are no longer available.
$
pip freeze > requirements.txt
$
conda list --export > spec-file.txt
$
conda env export > environment.yml
Recreating the environment
$
pip install -r requirements.txt
$
conda create --name myenv --file spec-file.txt
$
conda env create -f environment.yml
Additional Files
- README.md
- License
Creating the Dockerfile - Choosing the base image

FROM jupyter/scipy-notebook
Creating the Dockerfile - Copying Data
COPY Data /home/jovyan/work/data
COPY requirements.txt /home/jovyan/work/requirements.txt
COPY demo_notebook /home/jovyan/work/
Recreating the environment
$
pip install -r requirements.txt
$
conda create --name myenv --file spec-file.txt
$
conda env create -f environment.yml
Putting it all together
FROM jupyter/scipy-notebook
COPY requirements.txt /home/jovyan/work/requirements.txt
RUN pip install -r /home/jovyan/work/requirements.txt
COPY demo_notebook.ipynb /home/jovyan/work/
COPY Data /home/jovyan/work/data
Each Command is a "layer" for quick development place code that doesn't change towards the start
of the file
Building the image
$
docker build -t my-notebook .
Running the image
$
docker run -it -p 8888:8888 my-notebook
We use -it to run the container interactively
We use -p to bind the jupyter port to the host port 8888
Publishing the image
DockerHub
- Create a Docker Hub account
- Optionally create a Docker Hub Organization (ceregecl exists) Orgs page
- tag the image with org/image-name if organization else leave it as is
-
$ docker tag YOUR_IMAGE_NAME DOCKER_USERNAME/YOUR_IMAGE_NAME $ docker push DOCKER_USERNAME/YOUR_IMAGE_NAME
Using Volumes (advanced)
A Volume is a directory that can be shared between containers and the host (think of it as a USB plugged into a Virtual Machine).
Uses
- Containers aren't persistent so this can be used to save data to the local harddrive (think figures)
- You can load new data into the container by copying it to the volume
$
docker run -it -p 8888:8888 -v $PWD/results:/home/jovyan/work/results my-notebook
Local paths need to be full absolute paths (we use $PWD to get local directory)
Using Docker Compose
One file to build all the containers (if multiple) and hold run commandsBest Practices
- Link to Repository directly and obtain a DOI for the repository.
- Publish the image to a Docker Hub repository and provide link.
-
Organize your research
- Code
- Notebooks
- Data
- Results
- License + Requirements + Dockerfile + README.md
Creating a Github Repository
- Go to github.com
-
Top right click on the plugin
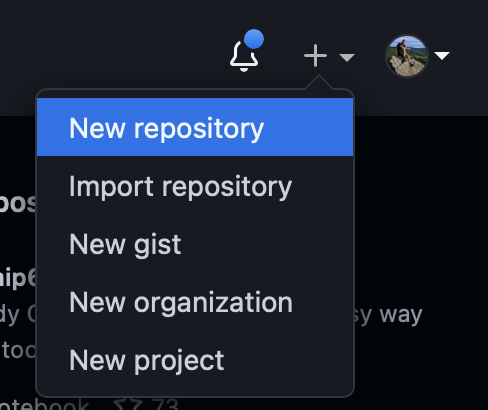
- Choose a name
- Add Readme
- Choose a License
- Click Create Repository
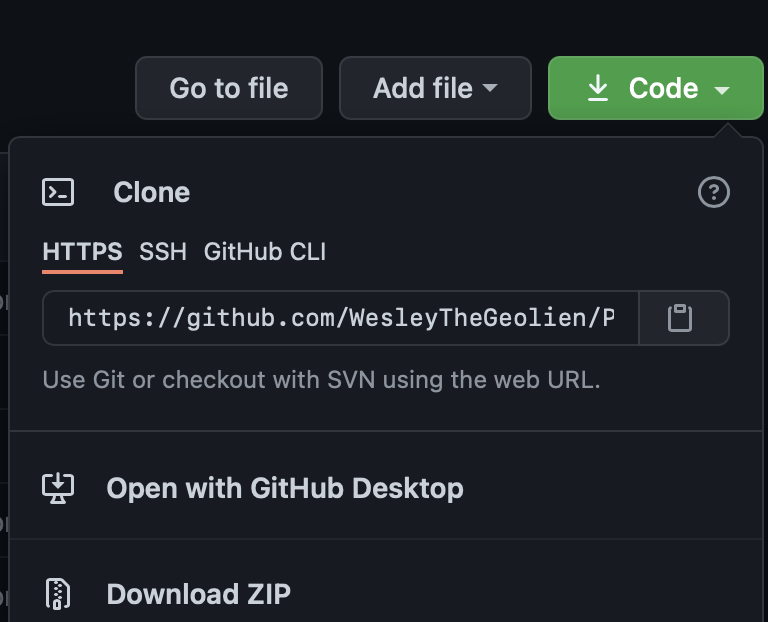
Working locally
$
git clone https://github.com/YOUR_USERNAME/YOUR_REPONAME.git
This can also be found on the repository website under the code button
Make local changes then to see the changes:
$
git status
$
git add *
To create a commit
$
git commit -m "YOUR COMMIT MESSAGE"
To push to the remote repository (update the server)
$
git push
Alternatives
- MyBinder
- Code Ocean - Workshop JupyterCon 2018 April Clyburne-Sherin, Code Ocean